Monday, June 2, 2008

How to Identify An Exotic Shorthair Cat


Exotic Shorthairs are wonderful shorthaired versions of the Persian, being hybrids between Persian and American Shorthair cats. They have the flat faces of the Persian but a short plush teddy-bear look, and the usual small high-pitched Persian voices. This breed was first recognized in the late 1960s. Very responsive to humans and human emotions; this breed has inherited their very tame personality and gentle ways from the Persian ancestry.

Identifying An Exotic Shorthair
Step 1:
Begin by looking at the body. The Exotic Shorthair is classified as a medium sized cat, but is at the high end of that class. Typically the male will weigh between ten and fifteen pounds, though they are actually shorter and don't stand as tall at the shoulder as the regular American Shorthair. What they lack in length and height they make up in breadth. They have extremely wide football player shoulders. Often their forms have elicited such names as "sumo kitty" and "Jabba the cat". Despite their appearance they are in fact not fat, this is an illusion created by their fur and muscle structure. They have a very wide and low body, with thick legs, and a barrel shaped midsection. The majority of their weight is accounted for by a squat and very dense bone structure and amazingly powerful muscles. The tail should be short and thick, carried low rather than pointing upward.


Step 2:
Examine the fur of the cat. For a shorthair breed it should be long, thick, and luxurious. This breed does not shed or need any grooming, so if you were to pet it, no hair should be stuck to your hand. The fur hangs in rolls from the cat's body, giving it the appearance that it is fat or obese. Fur texture should be similar to that of cashmere. Because the species is a hybrid of the American Shorthair, almost any coloring or pattern is acceptable and this is not an effective way of determining the cat's breed.


Step 3:
Pay close attention to the cat's head. A short and thick "linebacker" neck with a fur ruff should lead to a massive head. The skull is very wide and simply huge. The forehead is rounded; the cheeks are also rounded and impossibly full. The muzzle should be very short and end in a pug nose. The chin should be strong and jaws powerful, though this often appears understated due to the enormous surrounding cheeks. The cat's eyes will be almost perfect circles and widely spaced like those of an owl, their color should correspond to their fur. The most easily recognizable part of the Exotic Shorthair is most definitely the head. If it matches this description then you are most likely looking at a pedigree American Shorthair.


Tips & Warnings
According to cat show judges "The ideal Exotic should present an impression of a heavily boned, well balanced cat with a sweet expression and soft, round lines. The large, round eyes set wide apart in a large round head contribute to the overall look and expression. The thick plush coat softens the lines of the cat and accentuates the roundness". This is not meant to be an outdoor cat, and if you see one outdoors it is probably lost and in need of help. As a result most strays of this species don't survive long and should be brought to a shelter immediately. Its different look and loving personality is sure to find it a new home quickly.
Eye problems such as Keratosis Sequestrium can often be found in this species. It is prevalent in Persian and Siamese linked breeds. This is not genetic but the result of having a great deal of the surface of the eye exposed when the cat's eyes are open. This can be treated by a competent veterinarian, but if a cat contracts this disorder then it's likely to have relapses throughout its life, the owner should be prepared for this and have the resources and time to cover the medical bills.

How to Build a Laser


A laser is defined as an optical device which emits a beam of light radiation. Unlike light from other natural and artificial sources, a laser is monochromatic, meaning it only casts light of a very specific wavelength. If the wavelength were in the visible spectrum the laser would appear as a certain color. As lasers have been developed they've found uses besides the purely academic fields. They're commonly used to read the contents of CDs and DVDs. Extremely powerful lasers are used to cut through metals in heavy industry or etch patterns and designs into hard surfaces. Small and precise lasers are used in surgery to cut tissue and cauterize blood-flow. They also have military applications as range-finders and targeting devices. As a fun experiment and a cheap alternative to purchasing your own commercially produced laser, here is a guide to building your own laser.

Things You’ll Need:
Soldering Iron

Soldering Wire

Tweezers

100ohm POT

16X Laser Diode

Top of An Axis Module

Screwdriver

Triple A Battery Holder

2 Triple A Batteries

Power Switch

Cardboard Tube

Tape

Scissors

Sheathed Copper Wiring


Making A Laser
Step 1:
Take the positive and negative leads running from the Triple A Battery Holder and press them against the corresponding points on the switch. Press your soldering wire to the leads and melt the solder in place with the soldering iron. Set this aside.


Step 2:
Solder the 100ohm POT to the 16X Laser Diode. There will be three points on the back of the diode in a triangle pattern. The 100ohm POT will connect to the one top or outside point on the back of the diode. This will help regulate the flow of electricity through the diode to create an actual laser rather than a constant Light Emitting Diode.


Step 3:
Connect two lengths of copper wiring to the remaining contact points and solder them into place. The other ends of the wire should be soldered to the two remaining points on the back of the 16X Laser Diode.


Step 4:
There should be a screw on the side of the POT which alters the resistance it creates. use your screwdriver to set it to put out maximum resistance. Insert two Triple A Batteries into the holder and turn on the device.


Step 5:
Watch the diode and slowly lower the level of resistance on the POT. Stop when the diode is at its brightest. Turn off the device.


Step 6:
Slip the diode in the Top Half of The Axis Module. This Module looks a bit like the head of a flashlight. Essentially it is a metal cylinder containing a number of focusing lenses. The appropriate focusing of a laser is and always has been the most difficult part of building one and it's a little too sophisticated for someone without a degree in Physics, specializing in Optics, and in possession of a fully functional optical laboratory. So it's best to go with a store-bought lens.


Step 7:
Seat the diode inside the Module at a very specific distance from the lens. If the lens is far from the diode, you will create a harmless laser pointer. if the lens is right up against the diode you will create a laser capable of burning skin, setting paper alight, melting plastic, and charring wood. Decide which of the laser types you wish to create and apply a few pieces of solder to the back of the diode, where it touches against the inside of the Module, to hold the device in place.


Step 8:
Fit the whole device to slide down the inside of a cardboard tube such as you would get from a paper towel roll or toilet paper. With the front of the Module peeking out of the tube, tape it firmly into place. Cut the tube short enough that the switch protrudes out the back. Tape the switch into place. You now have a homemade laser that's just as effective as any you could buy commercially.


Tips & Warnings
If you accidentally create an LED you will know it because the diode will glow rather than cast a focused beam of light in a single direction. Simply break off the pieces of solder and try it over again. All the materials used in this procedure can be picked up cheaply at a Radio Shack or similar store.
Lasers should never be directed at living flesh, be it human or animal. In particular please keep lasers pointed away from eyes. Though they seem like toys they have the power to do permanent damage to living tissue and should be handled with the utmost of care.

How to Make A Wiccan Healing Soak

Many of the more unorthodox religions have no objection to people who attempt to perform spells and rituals which might be labeled as witchcraft. The fear of the witch in Europe and the American Colonies was great; surely the Salem Witch trials are a fine example of that. Often people who were accused of witchcraft were no more than healers, using herbal remedies, bits of half-remembered ritual, and whatever spells they could work to try to help people. Whether or not these spells actually worked is heatedly debated and has been for the last few centuries. For the sake of argument let us say that magic is real. Many of these healing charms were collected when the Wiccan religion was developed in 1953. Wicca, though still considered magic and witchcraft in the western world, is a very moral religion. They state that the nature of the universe is one of reciprocity. For that reason it is paramount that one should never use magic to do harm as it will return to the spell caster multiplied. It also means that good works are well rewarded. One such spell explains how to make healing bath salts that are good for aches, bruises, and sore muscles.

Things You’ll Need:
Rose Quartz Crystal
Mortar & Pestle
Rowan Berries
Clean Mason Jar
Compass
Lighter
White Candle
Pink Candle
Rose Buds (Pink For Preference)
Rock Salt
Small Pouch

Making Healing Bath Salts
Step 1:
Clean a space in your home or outdoors free of all clutter so you can concentrate on your work. Either work standing at a table or cross legged on the floor.

Step 2:
Use your compass to face east and light your candles in front of you, but well out of your reach so they won't get in the way as you work. Typically a white candle is representative of the soul and is used when working magic that requires concentration or meditation. A pink candle is representative of healing magics, and should be present when working healing magic of any kind. These need not be present, but they help to focus your energies on the task at hand.

Step 3:
Use your mortar and pestle to grind up a loose handful of rock salt. The exact proportions are determined by how much your mortar can hold, so you'll have to plan ahead. As you grind the salt say: "Creature of earth, I cleanse and purify you for use in my healing rite".

Step 4:
Add the rowan berries to the salt and grind them up while saying: "Creature of healing, I cleanse and purify you for use in my healing rite". The moisture from the berries should be soaked up by the salt, so make sure to use half as many berries as salt.

Step 5:
Add the rose buds and grind them up while saying: "Creature of love I cleanse and purify you for use in my healing rite".

Step 6:
Set the pestle aside and mix the contents of the mortar with your hands. Focus. Imagine in your mind's eye energy flowing from your heart, down your arms, through your hands, and into the mixture. Repeat three times: "Rowan, rose and salt together, make the aches and pains feel better".

Step 7:
Set the mixture aside and put yourself into a kneeling position facing east. You should have the rose quartz cupped in your hands. Ask your patron deity for the healing mix to do its work. Feel the blessing coming down from the heavens and lodging in the rose quartz. This may take some time to happen; only you will know when it has.

Step 8:
Pour the mixture, which should be fairly dry, into the pouch. Place the pouch into the jar so it stays fresh. Place the crystal on top of the bag and screw the lid down tight. Speak the word "Heal" with strength and emotion as you do so.

Step 9:
Mix some of the pouch's contents into running bathwater to use it. Say the following phrase three times: "creature of earth creature of water, creature of healing, creature of love, mix together and combine to renew, replenish, and heal".

How to Identify A Havana Brown Cat


The Havana Brown cat is also known as the Swiss Mountain Cat and was well known in England since the early 1980s. The cat received its name because their dark brown or chocolate coats resemble the color of Cuban cigars. They are a close relative of the Siamese and are often interbred with them because of the rarity of pedigree Havana Browns. This would definitely be classified as an indoor cat. They don't care about hunting and hate being alone. They like being around people, will actively follow them through the home, and cuddle at any opportunity they get. This breed is very soft voiced and rarely meows unless in distress. Havana Browns are also exceptionally intelligent and can often recognize certain words if they hear them repeated often. They also use their paws to interact with their environment. Trying to open cabinets, pointing at things, and manipulating small objects of interest in a way more akin to an ape than a cat. This guide will explain the steps to identifying a Havana Brown Cat.

Identifying A Havana Brown
Step 1:
Look at the cat's general shape and build. Browns are a small species and rarely stand more than ten inches at the shoulder and are a little over a foot in length. The average male weighs between eight and ten pounds, while the females are a bit smaller at between six and eight pounds. They are generally very thin and sleek with small paws and a very long tail that narrows to a point near the tip.


Step 2:
Examine the cat's fur. True Havana Browns have only one accepted color, a rich mahogany or chocolate that gives them their name. There should be no patterning on the fur, though kittens sometimes have tabby markings that disappear as they mature. The fur should be short and densely packed; to the touch it should be lightweight and incredibly soft. It is often likened to touching mink fur.


Step 3:
Check the cat's head. The Havana Brown's neck is long and slender, which connects to a square shaped skull. The cat's jaw is squared as well, making the snout seem more prominent and jutting than it really is. Wide expressive eyes and forward pointing ears give them a constant inquisitive or curious look. The eyes are always green too. The best way to tell if the cat is a Havana Brown is to examine the nose. If you are looking at the cat from straight ahead, the top of the nose should form a level line with the bottom of the eyes. If the cat does not have this trait then it is not a pedigree Havana Brown. If it does then you're looking at one of the rarest species of domestic cat in the world and should be grateful for the opportunity.


Tips & Warnings
During WW2 This cat breed was almost lost because of unchecked breeding with other random species. As a result this is considered an endangered breed because of the very small breeding population of pedigree Havana Browns that still exist. It's thought there are only about one thousand of these cats in existence today.

How to Identify a Chausie Cat


The Chausie is a hybrid between the African Jungle Cat and a plain domestic shorthair. It's a relatively new breed and was only registered officially in 1995. They take their name from the Latin term for the African Jungle Cat, Felis Chaus. Because of their ancestry they are consummate hunters and very active when they wish to be. Despite this they are also very sweet and love to play and interact with their owners. They don't mind being touched or petted, but this species doesn't really go in for cuddling, they act as if it were undignified. That's really the best way to describe the species; regal and fearless but not aggressive or anti-social. This guide will explain how to identify a pedigree Chausie.

Identifying A Chausie Cat
Step 1:
Look at the cat's general build. You should see a cat roughly one and a half feet high at the shoulder and almost three feet long. This is a big cat, Chausie's are known for being twice the size and weight of an average housecat. Despite their size these cats are not bulky, being possessive of an athletic build with a wide chest, small paws, long legs, and a thin but dense bone structure.


Step 2:
Examine the cat's coloring. There are only three official color patterns for the pedigree Chausie. The first is just plain black. The second is a brown ticked tabby. Cats with this pattern generally have a pale belly with a light tan body and darker brown stripes. The third color pattern is unique to this species and is called a silvered tip. The cat will have a sliver-grey coloring with black splotches all over its body similar to that of a leopard.


Step 3:
Take a look at the cat's head. It should have a long, but thick neck that leads to a tall and narrow skull. The jaw should taper sharply down to the snout and the eyes are comparatively low on the face. The entire head should be dominated by extremely tall and straight ears, sometimes tipped like a bobcat. In the cat’s resting position the ears should be angled to face directly forward like a set of headlights on a car.


Step 4:
Study the cat's behavior. A Chausie will typically have fluid and slow movements. They take their time, seemingly confident in themselves regardless of what situation they find themselves in. Their behavior has often been described as dog-like; they will obey commands and come when called. They follow their masters closely and will often sit patiently at his/her feet waiting for a command or attention. If you get the opportunity, watch the cat jump. Chausies are known for the incredible strength in their haunches, allowing them to leap up to six feet straight up. If the cat matches all of these criteria then it’s likely you’re looking at a Chausie. It’s a very rare breed not often found except in catteries.


Tips & Warnings
This species doesn't require almost any grooming; their short fine hair sheds very rarely. Chausies are very good jumpers and use this to pounce on their prey, but they are not inclined to climb, so you needn't worry about them getting onto shelves and countertops. This species gets bored easily when it's by itself, so make sure it has plenty of toys to play with. Cats of this species are known for leaping up great distances in the air to catch birds in mid flight.
Be careful if you keep other pets in the house with a Chausie, anything which could conceivably be the cat's prey, will be the cat's prey.

How to Strike the Drum Head Properly in a Press Roll

A drummer's kit, be it used in rock, jazz, swing, blues, or any other form of music is both extensive and expensive. Well over a dozen different size and make of drum can be used in any one performance given the drummer's need to produce different drum tones and pitches. The same drumming techniques can often be performed on different drums to result in a completely different tone. Typically the smaller a drum, the higher the pitch. In this guide you will be shown how to perform a press roll, also known as a buzz or crush roll, with particular emphasis on striking the drum head properly.

Things You’ll Need:
Drum Kit or Practice Pad
Drumsticks

Performing A Press Roll and Striking The Drum Head Properly
Step 1:
Begin by sitting close to your drum. Make sure both the drum is angled toward you and you're sitting high enough to be able to strike the drum directly on the center with ease. If you're sitting too low your drumsticks will glance off the drum's rim.

Step 2:
Grip one drumstick in each hand. The sticks should protrude from the top of your hands. Grip them tightly between the first knuckle of your index finger and the pad of your thumb.

Step 3:
Hold your fists horizontal to the ground. Rather than your thumbs being at the top of your hands, the knuckles of your fists should be the highest points of the hands. You should only ever raise your stick about half a foot from the drum's surface when doing a press roll.

Step 4:
Aim your stick at the center of the drum. Rather than dropping your hand to strike the drum, push your hand downward at the wrist. The stick should impact and bounce from the drum a few times at blurring speed. If the stick bounces up high and slowly returns to the drum head then it means you're not holding the stick tightly enough or your wrist is too loose. Don't let the stick bounce anywhere across the drum head except in the center, if you do it will change the quality of the sound, making it seem flat.

Step 5:
Practice striking the drumhead, letting the stick bounce, and then stopping the stick by pressing it downward after impact.

Step 6:
Develop a rhythm, repeating the stroke continuously until you can do it reliably and comfortably. Then start practicing with your other hand until you're proficient with both hands.

Step 7:
Learn to alternate using one stick and then the other, striking the center of the drum head accurately with both. When this becomes comfortable, slowly increase the pace of the alternation and see how fast you can do this. When the drum sounds continuously with no break between strokes then you have mastered this technique.

Tips & Warnings
Though high paced, this drum technique has little to do with movement of the fingers and more with the hands and wrists. The stick should be gripped tightly, try to keep your wrists loose to allow the sticks to bounce more after striking the drum. Though this technique is not hard to pick up, it takes a great deal of practice to smoothly be incorporated into your repertoire. Though this technique can be performed on any drum, you might wish to use a snare drum when learning. The head of the drum is bound more tightly and you will find the stick bounces more easily. A practice pad will bounce your drumsticks like a regular drum, but makes very little noise, allowing you to practice without disturbing people living nearby.

How to Use a 4-Way Neck Machine


A 4-way neck machine is a very simple device. It consists of a standing bar frame with a seat facing the flat side of the frame. There are several static handlebars at arm level and a padded armature protruding from the bar to pass by the user at roughly head height. On the other side of this armature a series of weights rests, allowing for greater or lesser resistance as the bar is moved. As far as exercise machinery goes, this device is small and relatively lightweight. It's unfortunate that many people forget that the muscles of the neck are important in maintaining proper posture and absorbing shock when struck to prevent neck or spine damage. Though its often only bodybuilders who exercise these muscles, participants of any contact sport can benefit from the use of a 4 way neck machine as a preventative measure against damage to the neck or spine. This guide will explain how to use a 4 way neck machine

Using A 4 Way Neck Machine
Step 1:
Sit in the seat facing toward the padded bar armature. It should press firmly against the forehead. Grip the handlebars at your sides to help keep your upper body in position and isolate the muscles of the neck. Using only the muscles of the neck, press forward on the bar with your forehead. Make sure to stop before you begin to lean foreword with the rest of your body. This exercises the flexor muscle group which allows you to tilt your head forward so that your chin touches your chest. Complete a full set of ten repetitions and move on to the next muscle group.


Step 2:
Sit in the seat either facing toward or away from the main assembly of the machine. The padded armature should rest against the side of your head slightly above the ear. Grip the bars on the machine to hold you upper body immobile. Tilt your head to the side, toward one of your shoulders, pressing against the bar. This exercises the lateral flexors in the side of the neck. After completing ten repetitions spin around to work the other side of your neck in the same way. Then move on to the next muscles group.


Step 3:
Sit in the seat with the padded armature resting against the back of the head. It should touch high up on your head, well above the join between the neck and the skull. Grip the bars and lock your arms tightly to help keep yourself steady. Tilt your head back to press the bar up, make sure not to push with your back; you should bend at the neck only. This exercises the extensors in the back and sides of the neck. Complete ten repetitions and you've finished your set. Either call it finished for the day or take a break and start all over again.


Tips & Warnings
The 4 Way Neck Machine does not work the rotator muscle group which allows you to turn your head from one side to the other. No such machine exists. Simple resistance exercises are the only appropriate solution. To do this press one hand to the side of your face and turn you head in that direction against the resistance of your hand. Be careful not to press too hard or you can pull or damage the vital muscles in your neck, or possibly even hurt your spine. When trying this machine for the first time, never use more than ten pounds of weight.
Never put too much weight on these machines, you should not ever have to strain to move the armature. It's best to go with more repetitions and less weight rather than run the risk of hurting yourself.

How to Build an Arched Doorway


Arched doorways are very typical of early 1900s American and British homes. Unfortunately in the last fifty years or so they've fallen out of vogue due to the extra time contractors and construction workers must spend to build them. They are not particularly expensive to build, but they are time-consuming, and time equals money where any form of construction is concerned. To a contractor, the more time it takes to finish one project, the more money has been lost because they could've been spending that time on their next project. They remedy this problem by simply charging their clients much more for the work. Over the past few years the Old World elegance and style created by this architectural affectation has regained popularity as many homeowners have found ways to set arches into their pre-existing doorways. This guide will explain how to convert a standard door-frame into an arched one.

Things You’ll Need:
2 Premade Columns

1 Premade Arch

Crowbar

2x4 Lumber

Circular Saw

Putty Knife

Claw Hammer

Tape Measure

Drill

Hammer

Sandpaper

Eightpenny Nails

Spackle

3 Inch Screws

Drywall

Utility Knife

1-1/4 inch Drywall Screws

Paintbrushes

Paint

Drywall Tape

Scroll Saw


Creating An Arched Doorway
Step 1:
Begin by using your crowbar to pry up the floorboards and frames from the doorway. If a door is attached you should use a screwdriver to remove the hinges from the door frame and set the entire assembly, both door and hinges aside.


Step 2:
Find the seems of the drywall above and to the side of the doorway, use you utility knife to cut through and reveal these seems and then pry the drywall free. Use your clawhammer to pull out the nails before pulling the drywall free if you are able. Set the drywall aside, if you're careful then you may be able to use these old pieces instead of having the hassle of purchasing and cutting new panels to the appropriate size.


Step 3:
Use your measuring tape to see how wide the door frame is, as well as the thickness of the doorjamb. Take note of these sizes and then go to a home construction, repair, or remodeling store. Purchase a premade archway of the appropriate size and two matching column frames. You could go about making your own archway, but this requires a good deal of carpentry experience as well as a very steady hand with power tools. Without these things then your arch will probably end up crooked and look off balance.


Step 4:
Fit the premade arch to the top of the doorway and stencil the area that touches the wall with pencil. Take the arch back down.


Step 5:
Use the pencil marks to cut two sets of 2X4 blocks. Each set should consist of three blocks, each at a different length. The first should be fitted horizontally to the top corner of the doorway. The second should be fitted vertically to the top corner of the doorway. The third should be fitted diagonally to meet the ends of the other two blocks in what looks like a right triangle. Use the drill and 3 inch screws to fit these blocks into place on both sides of the top of the doorway.


Step 6:
Use the circular saw to cut four identical pieces of drywall. Each piece should be a triangle matching the exact dimensions of the wooden blocks on you doorway. Again use the drill and the 1-1/4 inch screws to affix these pieces of drywall to each side of the wooden blocks, front and back. Use spackle and a putty knife to cover over the screw holes in the drywall.


Step 7:
Reaffix the old drywall to the wall surrounding the doorway with new screws in the old holes. Spackle over the screw heads.


Step 8:
Drill holes into the two side columns down where the doorjamb would go.


Step 9:
Fit the arch up to the top of the doorway and prop one end up by fitting one of the columns into place around one doorjamb. Push the arch tightly up to fit against the doorway and slide the other column into place. Hammer eightpenny nails into the predrilled holes of the columns as well as one nail into the center of the arch on each side of the doorway.


Step 10:
Use spackle to cover over all the nail holes and the joints between the arch and column. Wait for it all to dry. While you wait, apply new drywall tape to all the visible seems between the surrounding drywall panels.


Step 11:
Paint over the drywall and taped seems with the same color paint the rest of the wall is done in. The color of the columns and arch should match the surrounding baseboards.


Step 12:
Press your door to the new arch and stencil the top of the door with a pencil. Use your scrollsaw to cut the door along the pencil line.


Step 13:
Sand the top of the door smooth and fit it to your doorway. If it fits comfortably then drill new holes for the hinges and screw your door back into its new frame.


Tips & Warnings
Make sure to cover the floor and furniture with drop cloths. All cuts with the circular saw should be made outdoors to keep sawdust out of the house.

How to Build a Stun Gun


A stun gun is an electrical device used in self-defense that is designed to stop or incapacitate an assailant by delivering a high voltage shock of electricity to his body. This shock will cause the assailant's muscles to seize and he/she will normally collapse for a few moments. This will typically give the person with the stun gun a chance to remove themselves from danger by running away or more permanently incapacitate the assailant. This device is easily available to anybody in America over the age of 18 and can be carried legally anywhere except on specified government or private property. It would seem unwise to entrust a person's safety to a homemade device, so I would not recommend building one for defense against potential attackers. The homemade version that this guide will teach you how to make generates less than one quarter of the voltage of a professionally made model. Because of that I would suggest its use as a deterrent against dogs rather than people. Personally I live in an area with no leash laws and some very large, wild dogs and have found this an effective way of getting dogs to leave me alone when I go out for walks. In this guide you will find instructions on how to build your own stun gun.

Things You’ll Need:
Soldering Iron
Solder Wire
Wire Cutters
Screwdriver
Glue
Disposable Camera With Flash
Scissors
Thick Sheathed Copper Wiring
Five Star Binder/Planner

Building Your Own Stun Gun
Step 1:
Use your screw driver to pry open the back of the disposable camera.

Step 2:
Remove the batteries from the back of the camera.

Step 3:
Find the miniature light bulb that is the camera's flash. Pull it out to the full extension that the wires connecting it will allow. If the wires are soldered in place then cut them with the wire shears. If the wires are wrapped around contact points then just unwrap them carefully.

Step 4:
Cut two equal lengths of copper wire (About three or four inches should do). Wrap each of them to the wires that had been connected to the flash bulb. Touch some soldering wire to the joints and melt it into place with the soldering iron. You now have two much longer wires protruding from the camera. They should never touch, but be within a few inches of each other at all times. The thicker and stiffer sheathed copper wiring you use, the easier it is to accomplish this. Set this aside for the moment.

Step 5:
Cut the plastic cover of the five star binder free using the scissors. Try to keep it in a single piece if possible.

Step 6:
Place the thick plastic coating on the camera in order to sheath the exposed circuitry. Cut out holes for the flash and shutter buttons on the camera, and put the batteries back in place. Then glue the covers in place. You should end up with something that looks a bit like a thick appointment planner with two stiff wires sticking out of the top. Press the shutter button and watch the sparks fly!

Tips & Warnings
Though stun guns have a very high voltage payload, they have a very low voltage amperage. It is amperage and not voltage which can endanger human lives, making these devices non-lethal most of the time. Unfortunately they can cause heart attacks in people with heart problems.
When working with anything of an electrical nature, there is the possibility of being shocked. This particular device doesn't have enough strength to do more than make the muscles of the shocked area convulse, but as a good practice always makes sure to keep yourself grounded, free of static electricity, and always be aware of any body part near the electrical device.

How to Build Simple Shelters


Short of making fire, the most important survival skill you will ever learn is to make a shelter from the elements. Though you may have time to find permanent natural shelters on many terrains, in two specific types of terrain you might not live long enough to complete your search. In a desert the longer that you're out in the sun, the quicker your body will overheat and lose moisture. In heavy snow conditions the longer that you're out in the open the faster the winds will leach the warmth from your body and kill you from hypothermia. For that reason this guide will explain how to make simple shelters in heavy snow or snowstorm conditions as well as in desert conditions.

Things You’ll Need:
Digging Tool
Poncho or Sheet
Cutting Tool

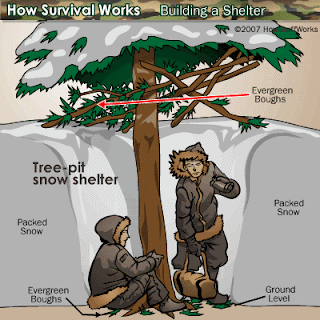
Building A Snow Tree Shelter
Step 1:
Look for a good sized evergreen tree with decent branch coverage.

Step 2:
Dig the snow out around the tree until you've got to an appropriate depth or you hit ground. Create a pit surrounding the tree at least five feet in diameter.

Step 3:
Pack the snow you've dug up into the surrounding pit walls to avoid cave-ins. If possible, mound the snow up to increase the height of the wind break. The key to survival in snowy conditions is to get away from the wind. Though the snow may be at freezing level, the wind-chill factor is much lower than that and will quickly chill you to the bone. Once you're chilled there's really no way to get back the warmth you've lost.

Step 4:
Cut branches from the evergreen that hang as high as you can reach and drape them over the top of the pit to create a loose roof. Leave the low hanging branches on the tree, they form a natural windbreak and act as partial protection from the snow.

Step 5:
Huddle in the center of the pit and wait for the snow to let up enough for you to be able to find your way to more permanent shelter and safety. It may seem tempting, but do not under any circumstances allow yourself to fall asleep in the cold. When you sleep your body temperature, respiration, and heart rate all decreases. If that happens in below freezing conditions there is a good chance you will die in your sleep.

Building Shelter In Desert Conditions.
Step 1:
Look for a nearby outcropping of rocks, a valley between sand dunes, or a depression in the earth which you can take advantage of. The depression need not be too deep, but it should be a little longer than your body and about a foot wider than your shoulders.

Step 2:
Use your digging tool to deepen the depression you've found. The trench you dig should be at least two feet deep and a little longer than your body. It need not be of uniform depth. The area where your torso and upper body should be as deep as possible to insulate from the heat of the sun, but your legs and feet do not need so much protection, so the trench can angle upward. This will save some time and effort.

Step 3:
Drape your poncho, clothes, or sheets over the top of the trench, leaving room near where your feet will go to crawl in and out. Stretch it as taught as possible to keep it from touching you when you are in your shelter. Anchor the poncho down on three sides of the trench with any nearby rocks. Sand will work too if no rocks are close by.

Step 4:
Sprinkle a loose layer of sand over the top of the poncho to add further insulation. Try to cover the poncho entirely without collapsing it. On the one hand the more sand you pile on the better it is at preventing heat energy from the sun getting to you, on the other hand the increased weight makes the covering more likely to collapse.

Step 5:
Crawl into your shelter and try to rest. During the daylight hours this shelter can reduce the surrounding temperature by as much as 40 degrees Fahrenheit. When night falls get out of your shelter, take your tools and poncho with you, and try to find help, water, or more permanent shelter.

Tips & Warnings
It should be noted that these shelters are not made for comfort; they are a quick way to get out of hostile elements to aid in your survival.

How to Make Swiss Cheese


Swiss cheese is actually made only in North America. In Europe and Australia it's called Emmental, though the exact recipe differs somewhat. Swiss cheese is perhaps one of the most easily recognized cheeses thanks to the large holes or "eyes" that riddle it. This is actually due to the bacteria in the cheese producing carbon dioxide bubbles that are trapped in the cheese as its solidifies. These bacteria are unique to Swiss cheese and also produce an acid which is what makes the cheese known for its sharp flavor.


Things You’ll Need:
1 Gallon of Fresh Milk

1 Tablespoon of Fresh Yogurt

1/4 Teaspoon of Propionibacterium shermanii Culture

1/2 Tablet of Junket Rennet

Large Pots

Measuring Cups

Whisk

Sharp Knife

Clean Cloth

Stove

Accurate Candy Thermometer

Stirring Spoon

Fresh Water

Several Large Bowls

Large Fridge and Freezer With Humidity Control and Temperature Control

Cheese Hoop

Salt

Drying Board

Ladle


Making Swiss Cheese
Step 1:
Place a large pot on the stove and turn the heat on its lowest setting. Pour the whole gallon of milk into the pot and clip the candy thermometer to the inside. Make sure the tip of the thermometer isn't touching the bottom of the pot or your temperature readings will be off.


Step 2:
Heat the milk to 95 degrees Fahrenheit. Take a little of the milk into a separate bowl and add to it all the yogurt and all the Propionibacterium shermanii culture. Whisk the bowl's contents back into the milk. Take the pot off the heated burner and let it alone for twenty minutes.


Step 3:
Pour 1/4 cup of cool water into a small mixing bowl and add the 1/2 tablet of Rennet. Crush the tablet first if you have to, then dissolve it thoroughly with the whisk. Because you are working with bacteria it is essential that you clean all containers and utensils with hot soapy water between uses. To that end you should first wash your whisk before using it to dissolve the Rennet.


Step 4:
Pour the Rennet mixture into the milk and mix it slowly. You don't want to agitate the milk, just mix it. Cover the pot with a cloth and leave it alone, completely untouched for half an hour. When you check on it the milk should have separated into curds and whey.


Step 5:
Use a sharp knife to cut the curds into a grid pattern about 1/8 inch by 1/8 inch. If the curd is not solid enough to hold the rows your knife defines then you didn't add enough Rennet and should try again. You could try adding more Rennet now instead of throwing out what you have, but the resulting cheese isn't likely to be as good.


Step 6:
Put the pot back on the stove and maintain the temperature at 95 degrees Fahrenheit for a little over half an hour. Slowly increase the temperature up to 125 while stirring to keep the mixture from burning or sticking to the pot. Once it reaches 125, cook it at that temperature for another 45 minutes. Don't stir it while it cooks.


Step 7:
Take the pot off the burner and allow the mixture to cool until it's bearable to the touch. Test to see if it's done cooking by squeezing a handful of curds into a ball and rubbing it between your palms. If the curds are done then they will crumble and break up in your hands. When the curds settle in the pot, use your ladle to take out what whey you can. Put this is a separate catch bowl for later.


Step 8:
Layer a clean cloth over a strainer or colander. Hold the strainer over the whey catch bowl and pour in the contents of the pot. The whey should strain mostly through and the curds should be caught in the cloth.


Step 9:
Wad up the cloth so the curd are in a ball in the center. Wrap the ball tightly and dip it in the whey catch bowl to keep it moist. Put the whole cloth into the cheese hoop and slowly press it for five minutes. The cheese hoop's job is to press out the moisture, as well as shape the cheese. The hoop is what gives cheese its solid pressed consistency rather than let the cheese fall apart. Thankfully automated cheese hoops exist so you need not worry about pressing the cheese for almost a full day by hand.


Step 10:
Open the cheese hoop and remove the cloth. The cheese should be able to hold together by itself for a few minutes. In a large bowl dissolve six tablespoons of salt into two cups of water. Rinse the cloth in the saltwater, then wrap the cheese up in the soaked cloth and put it back in the cheese hoop. Press the cheese for three hours. Make sure the container the saltwater is in can comfortably accommodate the cheese while keeping the cheese completely submerged.


Step 11:
Repeat this process for another three hours.


Step 12:
Remove the cloth, rinse it again, and set it with the curd back into the cheese hoop. Press the cheese all night long. To save time, chill the remaining salt brine solution down to 45 degrees Fahrenheit over the same night.


Step 13:
Remove the cheese from the hoop in the morning and put it in the salt brine solution, make sure it's totally submerged and leave it for two days at a steady 45 degrees. Flip the cheese after the first day.


Step 14:
Place the cheese on a drying board inside a refrigerator at 50 degrees with 90% humidity. The cheese will sweat moisture for ten days. Wipe down the board and the cheese each day. At the end of the ten days rub salt into the surfaces of the cheese.


Step 15:
Alter the temperature of the fridge to 70 degrees Fahrenheit with 75% humidity and wipe the cheese down with a salt water soaked cloth once every three days. Do this for a full 45 days. Make sure the cloth and salt water you use are both clean and fresh before each use. If you don't then you run the risk of introducing harmful bacteria into the cheese, which could make anybody who consumed the cheese very sick. By the end of the 45 days the cheese should have puffed up and developed holes because of the bacterial production of carbon dioxide. This is a good sign that everything is going as it should.


Step 16:
Lower the temperature back down to 40 degrees Fahrenheit and cut the humidity to 50%. Leave the cheese untouched to cure completely. This will take between four months and a whole year to complete. The longer you let the cheese cure, the more propionic acid it produces, enhancing the flavor.


Tips & Warnings
The longer Swiss cheese is aged, the larger the eyes in the cheese become, and the sharper the flavor becomes from the build up of propionic acid. Because the aging process for Swiss cheese takes so long that cheese makers make less of a profit from well aged cheeses. Because of this the really well aged Swiss cheeses are rare to find commercially and may need to be special ordered.

How to Make Turkey Calls


If you're an experienced turkey hunter you've probably bought and used thousand of dollars worth of equipment over the years. Camouflage clothing, feed, guns, ammunition, and lures all add up pretty quickly. It's likely you've already got a turkey call; many hunters have several they like to use because of the slightly different nuances each turkey call creates. Admittedly the average turkey call is not all that expensive, but when you make your own you are in control of the exact tone you want it to make. Different calls can communicate to different turkeys, some call to males, others females, and even to younger or older turkeys. To that end, here is a guide on how to make your own turkey call.

Things You’ll Need:
Rough Sandpaper

Wood Glue

Jigsaw

Precision Router

3/8 Inch Diameter Coil Spring

Drill with Small Bits

1 Inch Long Wood Screw with Fine Thread

Thin Aged Cedar 1/4 Inch Thick

1 Inch Thick Pine Board

Wood File

T-Square

Pencil


Making A Turkey Boxcall
Step 1:
Use your T square to measure out, mark, and cut three wood panels from the aged cedar. Each should be 1-3/4 Inches tall by 6 inches long. A fourth panel should be 1-3/4 inches wide by 8-1/2 inches long.


Step 2:
Measure two parallel lines on one of the three panels running down longwise approximately 1/8 of an inch from the panel's edges. Mark these lines with your pencil. With your precision router and a 1/8 inch diameter bit cut narrow channels on the panel following the marked lines. If possible angle the grooves slightly open outward toward the edges of the panel.


Step 3:
Draw a line 1/4 of an inch longwise on one edge of the two other panels. Then draw an arc from narrow end to narrow end, with the pencil line running to meet the straight line at the tips, but the center of the panel's long edge at its midline. Use the skill saw to cut along these arches, so on each of the two panels you have one long straight side and one curved long side. Sand out any jags along the curved sides, but not so fine as to loss the wood's original grain.


Step 4:
Line the grooves of the first panel with wood glue and fit the other two panels into place so that the straight sides go into the grooves. Set the box aside.


Step 5:
Measure out two square pieces of wood from the pine board, each should be 1 inch tall, 1inch wide, and 1 inch thick. Designate a top and a bottom for each of these cubes. On the bottoms draw a centered square using 3/4 inch lines. Use your wood file to taper the sides of the cubes so that the top is still a 1 inch square, but the bottom meets the pencil lines as a 3/4 inch square. Fit each of these tapering cubes into the ends of the box, they should be held in place by shear pressure and will require no fixing agent if done correctly.


Step 6:
Take the final wood panel and begin to shape one of the flat sides with the wood file. Unfortunately there's no other way to shape the paddle except through careful and exact workmanship, so take your time on this piece. The idea is to curve one flat side so that as it is worked over the top of the box, it will rub against the box's curved sides and produce a sound not unlike a turkey's call. Only work with one of the wood flats, leave the other side unmarked. Leave a line of untouched wood down the middle going longwise, and as you get further to the edges, the wood should become progressively narrower.


Step 7:
Fit the paddle to the box, curved side down. Drill a hole in the top corner through the paddle and into one of the tapered blocks beneath. The hole should be less than an inch deep and no greater in diameter than your screw. Fit the spring between the tapered block and the paddle so the box will create enough resistance to squeak when you use it. Then thread the screw through the paddle, spring, and tapered block and tighten it securely. You're done.


Tips & Warnings
The older the wood you use the better, the wood should be as dry as possible. Broken or damaged antique furniture is actually a good place to start looking for the right wood. Cedar is not the only wood you can use; different woods actually produce different tones when used in a boxcall. The key is to find a tight-grain wood with the rings as close together as possible.
Make sure to wear ear, eye, and hand protection when working with the saws.

How to Build a Dehydrator


The modern day household resolves around the kitchen, as you well know. A nutritionally balanced kitchen will be stocked with fresh fruits, vegetables, meats, cheeses, grain products, and canned goods. In order to store the perishables in our kitchens for as long as possible, most people will freeze their extra meat and vegetables and can only really enjoy fresh fruit during certain times of the year when these fruits are in season. But freezing food is costly and a little wasteful because of the electricity it uses. It also leeches vitamins from frozen foods. There is another economical and ecologically friendly option: a dehydrator. A simple household dehydrator can be used to dry fruits and jerk meat. This guide will show you how to make your own electricity-free dehydrator.

Things You’ll Need:
Black Paint

1x4s

2X4s

Tape Measure

Pencil

Paint Brushes

Mesh Screen

Cloth Screen

4 Small Hinges

Chop Saw

Drill

Wood Glue

Duct Tape

Scissors

1-1/2 inch Screws

1/2 inch Screws

2 Foot by 2 Foot Plywood

2 Foot by 3 Foot Plywood

2 Foot By 2 Foot Plexiglas

2 Foot By 3 Foot Plexiglas

Staple Gun


Building A Solar Dehydrator
Step 1:
Measure out and cut two three foot lengths of 1x4 using the chop saw.


Step 2:
Lay down the 2 Foot by 3 Foot length of plywood and apply a thick line of wood glue to its edges long ways. Affix the two 1X4s to run parallel to each other and standing on their sides, so that they stick up four inches from the plywood.


Step 3:
Carefully flip over the piece of plywood and drive three 1-1/2 inch screws along each edge so as to fix the 1X4s firmly in place.


Step 4:
Flip the plywood back over so the 1X4s are facing you, looking like a trough with two sides missing. Apply the black paint into the interior of the trough.


Step 5:
On one of the open sides of the trough divide one of the 2 foot sides into three equal lengths and affix a hinge with the 1/2 inch screws to each of the two interior dividing lines. The other ends of the hinges should be hanging free from the box.


Step 6:
Use the 1/2 inch screws to affix the 2 Foot by 3 Foot piece of Plexiglas atop the two pieces of 1X4. It should look like a rectangular box with the two smaller sides open to the air.


Step 7:
Measure out a 5 inch by 2 Foot rectangle of mesh screen and cut it out with the scissors. Use the wood glue to paste it to the open end of the box, the end without the hinges. Stretch it out tightly and use the staple gun to hold it in place. Set the box aside.


Step 8:
Measure and cut 4 pieces of 2X4, each should be 2-1/2 feet long. Lay down the 2 Foot by 2 Foot piece of plywood. Put wood glue on one of the ends of each of the 2x4s and press them to each of the four corners of the plywood.


Step 9:
Carefully flip over the plywood so that it is standing like a rudimentary table. Drive 1-1/2 inch screws through the plywood and into the 2X4s to hold them tight. Three screws in each leg in a triangular pattern give the table the most stability.


Step 10:
Measure and cut three lengths of 1X4. Two of them should be two feet long. The third should be 2 feet and ten inches long. Put wood glue along three of the four edges of the table. Press the 1X4s into the glue on their sides so as to leave one side of the box open.


Step 11:
Flip the table over onto the 1X4 and affix them by driving 1-1/2 inch screws into each other three sides. You'll have to put the screws more toward the middle of each side because of the table legs at the corners.


Step 12:
Stand the table back up on its legs. Hook the box with the hinges to the open side of the table and connect them by driving 1/2 inch screws into the open hinges. The long box should stand at an angle from the table, with the mesh lower edge against the ground.


Step 13:
Screw the remaining hinges to the corners of one side of the 2 foot by 2 foot piece of Plexiglas. The hinges should be affixed so that when the Plexiglas top lays flat against the table, the hinges will be closed or pressed together. Screw the remaining ends of the hinge to the top of the 1X4s to make a lid. The hinge of the lid should be where the side of the box is open to the air.


Step 14:
Line the interior of the table with sanitary cloth mesh or cheesecloth and seal the gap between the box and the table with duct tape. You're done.

How to Make A Wiccan Cold Remedy


Many of the more unorthodox religions have no objection to people who attempt to perform spells and rituals which might be labeled as witchcraft. The fear of the witch in Europe and the American Colonies was great; surely the Salem Witch trials are a fine example of that. Often people who were accused of witchcraft were no more than healers, using herbal remedies, bits of half-remembered ritual, and whatever spells they could work to try to help people. Whether or not these spells actually worked is heatedly debated and has been for the last few centuries. For the sake of argument let us say that magic is real. Many of these healing charms were collected when the Wiccan religion was developed in 1953. Wicca, though still considered magic and witchcraft in the western world, is a very moral religion. They state that the nature of the universe is one of reciprocity. For that reason it is paramount that one should never use magic to do harm as it will return to the spell caster multiplied. It also means that good works are well rewarded. One such mutually beneficial spell is the Medicamentum Horrescere Dirimo. It's translated literally as the potion to stop shivers and is a very potent and safe cold remedy.

Things You’ll Need:
Liquorice Root
Cinnamon Sticks
Salt Water
Soft Brown Sugar
Pan or Cauldron
Measuring Cups
Bottle With Cork
Strainer
Spoon
Stove
Clock

Making A Cold Curing Potion
Step 1:
Measure out 3/4 cup of water into a pan and bring it to a boil.

Step 2:
Lower the heat to a simmer and put in a cinnamon stick, three tablespoons of sugar, and a teaspoon of table salt.

Step 3:
Cook the mixture for ten minutes, stirring continuously.

Step 4:
Add the liquorice root to the pan to cook and stir the mixture counterclockwise for ten full minutes. While stirring, repeat the phrase: "Horrescere dirimo et cessare hodie" until the ten minutes are up. Phonetically it's pronounced: "Hor-ech-air-ay dur-ee-moe et says-are-ay hoe-dee-ay". The translation is: "Shivers stop and leave right now".

Step 5:
Add another three tablespoons of brown sugar to the pan. The liquorice root has powerful healing properties but can be acidic and therefore bitter. A positive mindset can be important when fighting an illness, so it's best not to disturb that with unpleasant sensations such as bad taste.

Step 6:
Strain the mixture out and pour it into a bottle, but let it cool to room temperature before corking it.

Step 7:
Repeat the phrase: "Horrescere dirimo et cessare hodie" once before corking the bottle and once before taking each dose. take one teaspoonful in the morning and another before bed, repeating the phrase before putting the spoon in your mouth each time. The cold will disappear within three days.

How to Build a Homemade Projector


Large screen digital projectors such as one would use in business presentations or in a personal home theater have become very popular and can be purchased in most stores specializing in electronic equipment. These projectors are connected your computer tower or laptop and can be used to play movies, news clips, still images, PC games, and other presentations. The only drawback to their use is the expense. A cheap projector will cost at least seven hundred dollars, while the high end projectors can cost well over three thousand dollars. However for those with a little ingenuity, it is possible to make your own for just over two hundred dollars. This guide will outline how to make your own digital projector.

Things You’ll Need:
Overhead Projector

LCD Computer Monitor

Computer Cooling Fan S

crewdriver

Foam Strips 10MM thick

Soldering Iron

Solder

Duct Tape

Electrical Tape

PC Tower


Making Your Own Big Screen Digital Projector
Step 1:
Start by gathering the materials you will need. The old overhead projectors such as the kind that used to be used in classrooms can usually be purchased for less than twenty dollars from your local library. A computer cooling fan like the kind that are found in the body of a desktop computer is about four inches square and can be purchased from electronics and computer stores for less than ten dollars. The LCD Monitor will be the most expensive item you will need to find. The cheapest new one you will likely find will cost over one hundred and sixty dollars. If you can find a used or damaged LCD monitor then buy it, only the screen itself need be intact. It is important that the Monitor screen be no larger than the glass window of the overhead projector.


Step 2:
Take the LCD Monitor and use your screwdriver to remove its plastic casing. Inside the shell should be the LCD screen attached to a metal backing.


Step 3:
Detach the data and power cords connecting the screen to the inside of the shell. Remove the LCD Screen carefully, there are delicate wires hanging from the screen's rim. These should not be bent or damaged in any way.


Step 4:
Place the foam strips on two opposite sides of the overhead projector top, just outside of the glass screen. Use plenty of duct tape to hold them in place.


Step 5:
Place the LCD screen face-down onto the overhead projector. The foam strips should hold the face about 10mm above the glass.


Step 6:
Reconnect the power and data feeds leading to your computer tower. Some models have plugs set into the screens themselves and this makes the job much easier. Other models will require you to solder the cables in place. To do this make sure you know what cable goes where first. Then get out your soldering iron and solder. Put the metal end of the cable against the connection point on the screen, hold a piece of solder against the join, and use the tip of the soldering iron to heat up the solder so it melts into place.


Step 7:
Wrap the electrical tape around any bare metal or wiring that you can find so as to avoid the danger of short circuits and electric shocks.


Step 8:
Place the fan against one of the open sides where you can see the space between the monitor and the projector. Duct tape it into place so the fan will blow cool air into this space, then connect the fan to the PC tower to power it.


Step 9:
Plug in the overhead projector, plug in the LCD monitor, and start up your PC to see if it's working properly. Anything that would be visible on your computer screen should now be projected onto a hanging screen or wall of your choice.


Tips & Warnings
The quality of the image you receive will depend on the resolution of your LCD monitor, the highest resolution you can get within your price range is definitely recommended.
The LCD monitor will short out from the heat if a cooling fan is not used and running at all times.

How to Cut Steel Tubing

Steel tubing of various widths and thicknesses are a very common material in metal fabrication for home modification and vehicle alterations. If purchased in bulk you'll receive them in large bundles wrapped tightly together in uniform lengths. To actually make use of these tubes you'll probably have to cut them to size. Because of steel tubing's great flexibility and toughness, this is a much more difficult process than one would think. This guide will explain several ways to effectively cut steel tubing as well as each method’s positive and negative aspects.

Things You’ll Need:
Acetylene Torch
Striker
Welding Mask
Protective Gloves
Vice
Or Cold Saw
Or Band Saw

Cutting Steel Tubing With An Acetylene Torch
Step 1:
Mark your steel tubing where you need it to be cut and lock it tightly in a vice. The tube should be immobile but not held so tightly as to dent the metal.

Step 2:
Attach your torch's lines to its oxygen and acetylene tanks. Make sure the valves on your torch are shut tight, and then loosen the valves on the tanks to pressurize your torch's lines. The lines should fatten up and become more rigid when this happens.

Step 3:
Loosen the valve on your torch to about half-way open. Hold your striker in your other hand and squeeze the wire handle. The piece of flint on the inside of the striker should kick up sparks and ignite the torch.

Step 4:
Adjust the valve on your torch so that the flame narrows down and losses its smoky quality. Want you want is a short, well defined yellow-white flame with a slight blue tinge near its base.

Step 5:
Put on your welding mask and gloves to protect yourself from the sparks and metal slag the cut pipe will produce. For this reason you also should never try to cut anything above you. The metal slag will drip down and burn right through your clothes and skin.

Step 6:
Bring the flame slowly down the line on your steel tube. The speed with which this is done is dependent on the thickness of the metal and requires a great deal of practice and trial and error before a person can do this reliably. The line of metal which you are heating is actually melting and being blown back and down by the torch. Remember to work with the center of the flame, not the tip. This is the most consistently hot part of the flame. This method of cutting is most effective for small jobs where only a few pipes need be cut, though it can be time consuming and requires a certain amount of skill to do properly. The cuts from an acetylene torch are clean with little to no burring on the edges, but the steel can suffer from warping and discoloration by the flame if not done correctly.

Using A Cold Saw To Cut Steel Tubing
Step 1:
Carry the tubing to the cold saw, unlock and disengage the latches on the saw.

Step 2:
Place the tube in the cradle and line up the saw blade above it with the point where you need the tube cut. A cold saw looks like a large table with a cabinet above it. You place the tube on the cradle extended from the center of the machine and lock the tube down tightly.

Step 3:
Make sure your body and clothes are clear from the machine and then press the button to start the machine. The cradle holding the tube will retract back into the machine. A large circular saw blade specifically designed for cutting metal engages and begin to speed up. When the saw is ready the cradle will raise and push the tube into the blade. This method of cutting tubing is very effective as it creates a smooth and very exact cut. The downside is that you can only cut one tube at a time and these machines are very large, very heavy, and very expensive.

Using A Band Saw To Cut Steel Tubing
Step 1:
Mark your steel tubing at the point you need it to be cut. Band saws utilize a continuous ribbon blade in either a horizontal or vertical plane to cut a clamped tube. These saws come in many different sizes, from small models you can keep in your garage to industrial sized behemoths that wouldn't fit in your living room.

Step 2:
Don protective eyewear and gloves, and bring the tube to your band saw. Turn on the band saw and bring your tube to rest just in front of the running blade.

Step 3:
Brace one hand on each side of the tube, making sure to keep your fingers out of the way of the blade, and push the tube through the saw. The cut pipe might need to be ground smooth, but the band saw works quickly and efficiently. Industrial size models have trays that you place the tube in which pulls the tube through the saw. They also give you the opportunity to make bulk cuts. You can set a bundle of pipes in these machines and the saw will cut through all of them at once. That is the major benefit of such saws, though they can also be very dangerous and should only be used by professionals.

Tips & Warnings
Using a hacksaw might work on particularly thin tubing but this is very labor intensive. It will dull the blade of your hacksaw quickly, and the edges of the cut will have a great deal of burring and need to be ground smooth with a rasp or metal file.
Be careful to use eye protection and gloves when working with any of the machinery mentioned in this article. Metal filings can lodge in the mucous membranes of the body and cause terrible pain and damage.

How to Build a Toilet Paper Launcher


Many people, author included chose to spend their childhood Halloweens not looking for treats, but out playing tricks on people. We were all petty vandals at one time or other. We would soap car windows, throw eggs at house windows, and launch toilet paper over people's roofs and trees. I was always annoyed by the fact that I couldn't get the toilet paper to fly very far when I threw it. It also never unraveled correctly. As I've grown up I've felt nostalgic for those Halloween nights and the old tricks. With a degree in mechanics under my belt and free time on my hands, I've come up with a better way to toilet paper people's houses. This guide will show you how to build a toilet paper launcher.

Things You’ll Need:
4 Inch Wide Plastic Containers
Value Pack of Toilet Paper
Drill
3 Feet of PVC Pipe 4 Inches In Width
PVC y Junction
PVC Screw Port & Plug
PVC Plug
PVC Tape
PVC Cement
Barbecue Lighter
Can of Hairspray
Ramrod
Scissors

Step 1:
Use your PVC tape to connect the three foot length of PVC pipe and the top of the y junction. Smear the junction with PVC cement. Wipe off the excess cement. It's important that the three foot length of pipe be four inches in diameter. This is the size of the average roll of toilet paper.

Step 2:
Connect the PVC Screw Port and Plug to the end of the y junction opposite the three foot length of PVC Pipe. Tape the two pieces together and Cement them in place. Set the launcher aside.

Step 3:
Strip the barbecue lighter of its plastic housing and disassemble it entirely. Look for the igniter mechanism. It should look like a length of sheathed wiring with a bare metal tip connected to a pressure switch. Keep this and dispose of the rest of the lighter.

Step 4:
Use the drill to bore a hole into the center of the remaining PVC plug slightly larger in diameter that the wire of the igniter.

Step 5:
Fit the igniter into the hole in the plug. Make sure the sparking tip extends all the way past the plug. Cement the igniter in place; be careful to not get any cement on the end of the igniter or it won’t spark. Let the plug dry and then tape around the front and back of the plug to make sure the hole in the plug is completely air-tight.

Step 6:
Cement the plug in the remaining hole of the y junction on the Toilet Paper Launcher. The pressure switch should be raised on the exterior of the launcher and easily triggered. With the launcher itself complete, let it dry for at least a full 24 period before firing.

Firing The Toilet Paper Launcher
Step 1:
Take an empty Tupperware container about four inches in diameter such as one would buy dairy products in, and cut off the top lip. You should have a plastic cylinder with a base at one end.

Step 2:
Use your scissors to cut four lines down the sides of the container all the way to its base. These lines should be equidistant from each other and allow the container to open like a flower. You've just made something called a sabot. It is a plug that goes behind loose shot in an old fashioned gun or cannon. When such cannons were fired the gas that expelled the shell often just went around the loose shot rather than pushing it out of the barrel because the shot was not air tight. Toilet paper is not air tight either, so you need to make a sabot to be placed behind it in the barrel of the launcher. These sabots will last for four or five uses before disintegrating. Luckily they’re cheap and easy to make.

Step 3:
Rip the first square of toilet paper from the roll so that it will unravel freely in mid-air.

Step 4:
Slide the toilet paper roll into the sabot.

Step 5:
Fit the sabot base-first into the barrel of the launcher and use a ramrod (a broom or mop handle will work fine) to push the toilet paper down to the bottom of the three foot length of PVC.

Step 6:
Unscrew the plug in the back of the gun. Shake your can of hairspray and spray it into the back of the launcher for a few seconds. You don't need much for this to work. Quickly screw the plug back in place and make sure all the seals are tight.

Step 7:
Take careful aim away from breakable objects and living creatures, and then press the igniter switch. The launcher should fire the toilet paper roll out with the sabot. The slits in the side of the sabot will make it fan out once it meets air resistance and slam it to a stop, dropping to the ground for repeat use. The speed at which the toilet paper is launched will unravel the roll and/or shred it in mid-flight. If you're doing this on your own property then enjoy, if you're shooting at other people's houses or possessions then you'd better start running!

Tips & Warnings
Often people who really love their launchers will modify the basic design to be more comfortable and paint designs on them for fun.
Be careful not to use too much hairspray, this chemical is highly flammable and can sometimes blow apart the gun if the chamber is too full.

How to Cast Spells to Levitate

Many of the more unorthodox religions have no objection to people who attempt to perform spells and rituals which might be labeled as witchcraft. Wiccan beliefs, New Age beliefs, and an amalgamation of others that proclaim the importance and power of the human spirit have contributed to what is known as Ritual Magick. Of the various kinds of magic practiced today this is the most mysterious and controversial because it recognizes no particular spirit or deity, nor will it recognize the concepts of white or black magic. The belief is that the spell itself is simply a tool and how the tool is used is what determines the label or "good" or "evil". This Magick is characterized by its use of many esoteric ingredients, magic circles, chants, and sacrifices to augment the powers of the caster in order to successfully complete the spell. This guide will explain the necessary steps to cast a spell giving the user the power to levitate him/herself.

Things You’ll Need:
Chalk or Colored Duct Tape
Lavender
Vervain
Dragons Blood (herb)
Marigold
Raisins
Rosemary
Ginger Root
Dragons Blood Oil
Crystal of Choice
Seven Purple Candles
Eight White Candles
One Black Candle
Peppermint
Garlic
Thistles
Clove
Three Apple Seeds
Two Purple Cloth Bags
Cinnamon
Lemon
Verbena
Hops
A Down Feather
High John Oil
A Small Glass of Bottled Seawater

Awakening Your Spiritual Energies and Gathering Them For The Spell
Step 1:
Fast for two whole days before beginning the spell process. You may drink as much water as you like but can only eat of the same herbs that you will be using in the spell. Verbena, lemon, hops, ginger root, and raisins are all safe to eat. Only gem, lemon gem, or tangerine gem are edible species of marigold, so make sure you know what kind you've got.

Step 2:
Put the three apple seeds into one of the purple cloth bags and then fill up the rest of the space with lavender. Tie it tightly closed and place it under the pillow of your bed. This is a protective bag that you will need whenever you go to sleep after casting the spell. By opening the third eye and drawing powers into yourself in order to levitate you make yourself a target of spiritual creatures and entities. You become a beacon to them where they would likely not even notice a regular person and non-practitioner. The inherent properties of the herbs in this bag ward off spirits from attacking you in your dreams.

Step 3:
Take the second bag and place within it vervain, dragon's blood, raisins, rosemary, ginger root, a few drops of high-john oil, and the crystal. Place this under your pillow beside the first bag. This bag is meant to grant you inner power and will recharge the spiritual energies that you deplete by levitating each night that you sleep on it.

Step 4:
Light and place seven purple candles, four white candles, and one black candle in a wide circle around yourself. This will ward off spiritual entities that might mean you harm while you are casting your spell.

Step 5:
Inscribe a smaller circle around yourself with chalk or colored duct tape. This circle will serve to contain the energies of the spell and prevent them from dissipating as well as keeping outside influences from affecting the spell's outcome. For that reason it's very important that the circle be complete and well defined, with no breaks whatsoever. Once the circle is closed you cannot leave the circle of let anything pass through or over it, so make sure you have all your spell components with you inside the circle. Sit down cross-legged.

Step 6:
Repeat the following words three times: "Little seed with cap so fine, grant me strength and make it mine. Make me strong as your sturdy tree, as I will so mote it be."

Step 7:
Meditate on these words for as long as it takes to clear your mind of all other distractions. Envision your bed. See the bags under your pillow beginning to glow and pulse with power.

Step 8:
Chant the following words three times: "Strength of day strength of night, grant the power beyond my sight''.

Step 9:
Take marigolds in hand and chant the following words: "I shape, I build the ultimate power from blooms the perfect flower''.

Casting The Levitation Spell Itself
Step 1:
Remain within the circle and draw a pentagram on your forehead with the dragon's blood oil. Dust the design lightly with cinnamon. Remember a pentagram is a five pointed star that points upward, not downward.

Step 2:
Place the glass of bottled seawater before you and take a sip. Any herbs you haven't yet used should be placed in small mounds surrounding your body. Specifically these should be the hops, clove, garlic, thistle, and peppermint.

Step 3:
Speak these words: "I invoke the Goddess of earth and love, She who sees all and does not fall. Hear me now and open thine eyes to see O moon of night, star of the sea. I invoke you! Open thine eyes to the world of the unseen make my senses sharp and keen. Open thine eyes to the vine, grant thee power of sight and make it mine. Grant thee the fruit if sight make me see clearer then night. Open thy eyes 3 times 3, as I will so mote it be."

Step 4:
Now say the prayer: "O most beautiful flower fruit of the vine splendorous of the universe, blessed mother and maiden, crone of all, immaculate goddess, assist me in my hearts desire". Then state your desire. From this point on you need not perform this ritual again to levitate. There is a separate and much more simple incantation you simply give voice to and the spell will activate.

Using the Levitation Spell
Step 1:
Draw a protective circle around yourself with chalk or colored duct tape

Step 2:
Hold the down feather in your dominant hand and place four white candles around yourself within the circle.

Step 3:
Light the candles in a clockwise direction while still holding the feather.

Step 4:
Sit cross-legged and face north.

Step 5:
Chant these words nine times: "In the light I see, in the dark I am blind, in the world I walk, in the circle I fly".

Step 6:
Concentrate on being as light as the feather in your hand. When you have this image squarely in your mind blow lightly on the feather to levitate.

Tips & Warnings
It's probably best to already have some experience with Ritual Magick before casting this spell. If you're new to this you it would be safer to attempt this spell with the aid of a practiced spellcaster.
The circle must be clearly defined and unbroken throughout the entire casting process. This circle provides protection from outside influences and entities. If the circle is broken while the spell is being cast the energies built up within the circle can cause a spiritual backlash and harm or sicken the caster.

How to Build a Wooden Ramp for a Shed


Most American home-owners mow and care for their own lawns. This necessitates a wealth of lawn-care equipment such as lawnmowers, weed eaters, wheelbarrows, and miscellaneous hand tools. Traditionally these are stored in a shed near or attached to the back of the home. Such sheds are either pre-fabricated or assembled on site. They're waterproof and keep your outdoor tools safe from the elements. You'll find that the lip of these sheds are rarely level with the ground. It's no great hassle to carry in the hand tools you use, but there's no chance you'd be able to carry in bigger machines like riding lawn mowers. They’re just too heavy. That's why many people have a shed ramp. You could pay a carpenter several hundred dollars to build and install one for you, but why spend the money when you can build your own easily and on a shoestring budget? This guide will explain how to make a quality wooden shed ramp quickly and affordably.

Things You’ll Need:
Drill
Wood drill bits
Metal drill bits
Through bolts
Hammer
Two-inch nails
Circular Saw
2 Wrenches
One treated lumber 2X4
Multiple treated lumber 4X4's
Sheet of 3/4 inch plywood
Tape Measure
Wood Pencil
Shovel
Asphalt Shingles (Optional)

Building A Wooden Shed Ramp
Step 1:
Use the drill to bore holes into the lip of the shed about an inch below the door. You'll need to use a specialized drill bit to get through the shed wall if it's made of metal. Three holes equidistant from each other should be sufficient. These holes should be only slightly smaller in diameter than the through bolts you'll be using.

Step 2:
Cut the 2X4 to be as long as the shed's lip is wide. Line up and mark the holes from the shed onto the 2X4 with a wood pencil. Bore holes into the 2X4 of a slightly smaller diameter than the through bolts you have.

Step 3:
Line up the shed's lip and the 2X4 and attach the two with the through bolts. Use your wrenches to make sure the bolts are as tight as you can get them.

Step 4:
Take your circular saw, tape measure, and your 4X4s. You'll need one 4X4 for every two foot width of the shed's lip, but you should use at least two. The length of your 4X4s is determined by how high off the ground the lip of the shed is. The 4X4s should be at least one foot long for every three inches that the shed's lip is off the ground. If the ramp is too steep your heavy equipment won't be able to get enough traction and either slip down or tumble off.

Step 5:
When you've cut the 4X4s to length, lay them on the lip of the shed and mark the spots where the other ends touch the ground. Dig a small trench the full width of the shed's lip where the 4X4s will touch the ground. This will help to anchor the finished ramp in place and keep it from slipping away from the shed when under a heavy load. The 4X4s will only more solidly embed themselves in the ground as time goes by.

Step 6:
Cut one end of each of the 4X4s at a 45 degree angle using the circular saw, so instead of a flat end you have diagonal ones.

Step 7:
Lay the pointed ends of the 4X4s horizontal to the ground. Use your tape measure and pencil. Measure two inches back and one half inch down from the long tip of each 4X4. Mark this point and draw a vertical line down as well as a horizontal line back to the slanted end of the wood. Cut along these lines with your circular saw. This has effectively notched the ends of the 4X4s so they will fit easily over the top of the 2X4 that you have anchored to the shed.

Step 8:
Place each notched length of wood over the anchored 2X4 and drive a few nails into each to hold them together. The other ends of the 4X4s should fit snugly into the ditch you've dug.

Step 9:
Lay your plywood over the 4X4s and mark their dimensions on the plywood with a pencil.

Step 10:
Follow the line's you've marked in the plywood with your circular saw.

Step 11:
Nail the fitted pieced of plywood into place. Your nails should form nice orderly rows that travel down the length of each 4X4 stud under the plywood. You should have a practical and very effective shed ramp now. You also have the opportunity to take things a step further and increase the traction on the ramp by tacking a series of asphalt shingles in rows along the plywood surface. This is entirely optional.

Tips & Warnings
Once your ramp is complete you may want to seal the wood against the damp, mildew, and mold.
Be careful when working with power tools

How to Cast Meditation Spells


Hermetic magic is one aspect of Hermeticism. Hermeticism is a set of philosophical and religious beliefs based on the writings of Hermes Trismegistus. It combines natural and alchemical lore with religious pantheism and moral philosophy to create a complex structured system that charts the flow of magical energies and works to redirect them. The best examples of Hermetic magic are meditation spells, otherwise known as circle spells for the complex magic circles used in compound with elemental representations. The purpose of these spells is not to have an impact on the physical world but to directly affect the spiritual world. As may be guessed from it's name, meditative spells require the magician to enter a state of meditation before casting. The most common and least dangerous of these spells is the truth spell in which you can contact the mind of another and exchange information. This guide will explain the steps, and dangers, of casting such a spell.

Things You’ll Need:
3 White Candles (White Represents Spirit)

Chalk or Colored Duct tape

Lighter or Matches


Casting A Meditation Spell (Contact Spell)
Step 1:
Draw a large circle around yourself. This spell is not advanced Hermetic magic so there need be no inscriptions or runes used. Use the chalk or the colored duct tape to make the circle. Make sure it is a thick and unbroken line. From this point on you should not break or let any part of your body outside the circle. The spell will be broken if you do, the shock of which can be dangerous to you and the person you would contact.


Step 2:
Stand in the center of the circle and place the first candle in front of you.


Step 3:
Light the candle and speak the following words: “I am I, and I seek truth".


Step 4:
Place the second candle slightly behind you and to your immediate left. Face the candle, light it and speak the following words: "I am you, and I seek the truth".


Step 5:
Place the third candle behind you to complete the triangle inside the circle. Face the candle, light it and speak the following words: "I am we, and I seek the truth".


Step 6:
Sit in the center of the triangle and face the first candle.


Step 7:
Close your eyes and focus on your breathing. Clear your mind of all extraneous thought. It may take minutes to enter this meditative state, it may take hours. Just take as long as you need.


Step 8:
Envision the person who you wish to contact sitting in front of you, looking at you over the lit candle.


Step 9:
Envision your spirit body separating from your physical body. See it rise up to look down on you and the other person. Move your spirit body and turn it around so that you are behind the other person, looking at his/her back.


Step 10:
Say in your mind: "I seek the truth and nothing but the truth". Slowly move so that your spirit is in the body of the other person. Look out from his/her eyes at your physical body sitting in the circle.


Step 11:
Sift through the other person's mind carefully. See what he/she sees, hear what he/she hears, and know what he/she knows. Converse with him or her if you wish.


Step 12:
Envision your spirit body leaving the body of the other person and returning to its physical shell when you have completed your task.


Step 13:
Open your eyes and blow out the candles in reverse order. Clean up the chalk or pull up the duct tape. Think on what you've learned.


Tips & Warnings
The cardinal rule in all magic is to do no harm. Never use this spell or any other spell for selfish or harmful purposes.
This spell should not be cast on someone who is unwilling or does not wish to converse with you, the consequences of forcing your will on another being can be dire. Do not break the circle at any time during the casting of the spell. You run the risk of harming yourself and whoever you would contact. Hermetic magic is advanced and very powerful with clear cut definitions of good and bad. Don't try such magic without experienced guidance.